• Skip to primary navigation
  • Skip to main content
  • Skip to primary sidebar
  • Skip to footer
  • LOG IN
  • SUPPORT
  • CART
  • ABOUT
  • MEDIA
  • HOST LAUREL
  • CONTACT
  • BLOG
LAUREL BEVERSDORF

LAUREL BEVERSDORF

Movement Courses and Teacher Training

  • ONLINE COURSES
  • LIVE/ONLINE EVENTS
  • PRIVATE SESSIONS
  • VIRTUAL STUDIO
  • Nav Social Menu

    • Facebook
    • Instagram

4 Hacks for Teaching Left & Right Online with Props

1 Comment

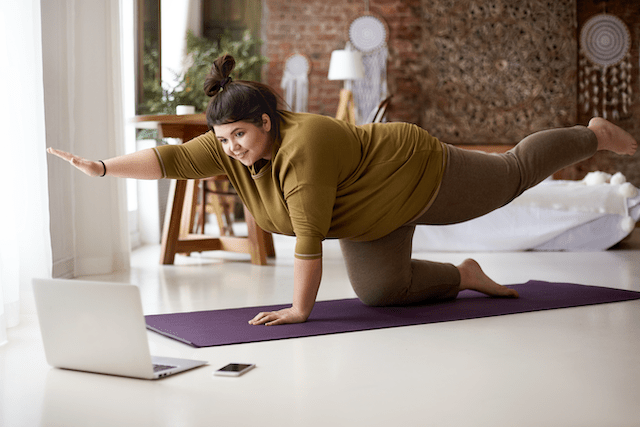
Teaching live classes online presents new challenges to teachers. These include

  • being able to see students clearly and provide feedback,
  • ensuring they can see you clearly within the limits of your teaching space,
  • creating a feeling of personal connection, and
  • navigating tech mishaps with the camera, microphone, and internet connection.

Some of these are new to teachers who grew up teaching live in-person classes, but one challenge that hasn’t gone away—and maybe got harder—is helping students follow cues of left and right.

THE CHALLENGE OF CUEING LEFT AND RIGHT ONLINE

Cueing left and right may be especially challenging if you teach flow-based movement like vinyasa flow yoga, primal movement, kettlebell flows, or dance. In more flow-based modalities like these, it’s common that movements involving asymmetrical body positions, sometimes referred to as unilateral positions (where the R & L sides of the body are positioned differently or move in different directions) are strung together in a dynamic sequence. Because you’re moving somewhat quickly, it’s difficult in any context to remember which foot/arm/prop goes where even while watching an instructor in the room with you.

When you enter your virtual classroom, things get even more turned around—literally—so the tricks we use as teachers to manage rights and lefts in-person aren’t always available. The reason is pretty straightforward: When we lost the ability to be in the same room together, we didn’t just lose time to chat and drink tea. We lost many of the common spatial reference points that could be used in place of right/left (or forward/back, side-to-side, etc.). Here’s a breakdown of what got lost in translation in the move to online classes: 

1. Room-based reference points. When everyone is together in the same room, facing the same orientation, a teacher’s cue to move the left or right side of the body would mean the same thing relative to landmarks within the room. Everyone’s right arm would be closer to, say, the door, or window, and or blue wall. In this way, teachers can easily translate “left” and “right” into other reference points, and instead say something like “lift your arm closest to the door-side of the room” (to mean lift your right arm). Everyone will get it right (er, correct), since the whole class has the door to their left. 

Online, students are practice in different environments–rooms with different shapes and angles, different kinds of furniture and textures, even outside, where there are no walls, doors, windows, or even ceilings to focus on. As such, teachers can’t reference common landmarks to serve as orientation for which direction to move.

2. Other bodies as reference points. In-person, students are usually practicing with other students surrounding them, and often with the teacher demoing up front for some or most of the class. This allows them constant visual input to inform their choice to move left or right. If everyone shuffles one way and you go the opposite, it’s easy to tell and adjust; it’s also easier to see those outliers from the vantage point of the teacher.

Online, these bodily references go away, even if you’re on a two-way streaming platform. While there may be other bodies in a students’ movement space, they may or may not be doing the class with them. Watching other students in “gallery” mode online is also rare, since most of the time they’d rather be able to look at the teacher. Lacking the reinforcement from the rest of the class, students rely solely on the teacher to demo for them.

While seeing a teacher up close has some benefits, when it comes to right and left, though, looking at a screen doesn’t always provide the most helpful landmarks. Your three-dimensionality becomes flattened, and all sense of orientation depends on where their screen is located in their space, which will be different from student to student. Even if the teacher makes a specific suggestion for how students should orient relative to their screen, it’s not always possible for everyone given the constraints of their space. Many students are practicing in fairly tight quarters with a limited number of places they can place their screen to be able to see it. Hence, your right might be their back-diagonal, so if they’re strictly following you they might not feel in sync, or have to move out of the camera’s view. As the teacher, it’s hard to tell if someone has lost their way if you’re squinting at tiny squares on your screen, which might also be tiny.

3. Mirroring demos. Often, to prevent this R/L confusion, teachers might choose to mirror their students in a live class, in which they face the student in the pose. The teacher would demo a movement on their right side, for instance, while verbally cueing the movement for the student’s left side. In this way the demo creates a mirror image for the student to follow along to visually. The other approach is to turn around, so the teacher’s back is to the class. This is not ideal for seeing the students, but then the teacher can do the movements on the same side (R/L) as their students, and not get tripped up in words.

Online, mirroring is possible, but it’s not always helpful since its efficacy requires that student and teacher face each other. Since students will often face various directions relative to their screen, you cannot always count on mirroring being relevant or helpful. For many teachers, it may not be worth trying then, since mirroring can also create a lot of confusion for the teacher about what side their demoing and what side their teaching in the sequence.

I ASKED MY STUDENTS & FOLLOWERS: “DO YOU FIND IT CHALLENGING TO TEACH LEFT AND RIGHT?” 64 PERCENT SAID “YES”

When I asked my audience on Instagram what tricks they used to counteract the challenge of teaching left and right, many listed that they mirrored (but found it mixed up their own ability to remember what side they were doing). Some mentioned that they replaced R&L with front and back. I’m assuming they mean front and back of the mat, which might be a universal prop their students use in mat-based modalities, but doesn’t help with non-mat based modalities, students who don’t use a mat, or sequences that go beyond the borders of the mat, which are more and more common as yoga teachers begin to blend modalities within their asanas classes.

REPLACE ROOM-BASED CUES WITH PROP-BASED CUES

And so, given the challenges of verbally cueing L & R on Zoom during flow-based movements, I thought I’d share four strategies that I’ve found especially helpful to help students distinguish their R side from their L. All of these tips share a common approach: they all utilize a prop, which replaces the other people/things that could serve as common landmarks in a shared space. This allows the student to connect the verbal cue of L or R to the tactile or visual feedback of a prop everyone in the class is using in a particular way.

Some of these strategies can be applied in the moment, to help orient students while they are in motion; others can be pre-taught to help imprint the feeling of the L or R side before moving. Some of these strategies work best for certain body orientations than others, whereas some are more universally applicable to any body orientation. 

With that, here are four tactile-feedback strategies for helping students find their L versus their R sides in a movement. These are helpful for both in person and online, but might especially make life easier online. I hope they give you a lot of good ideas to build off of in your teaching!

1. PLACING A PROP ON ONE SIDE.

Start by having students place an object like a yoga block on either their L or their R side (out of the way of the movement they will be doing.) This could be the only time you have to mention left or right. The rest of the time you can say move toward or away from the block, or bend the block-side elbow, straighten the non-block side elbow.

2. IMPRINT WITH TOUCH

Before doing one side of your sequence, use an implement (like your hand) to touch the L or R side so it’s in the students’ awareness. Then teach the sequence replacing L or R with (i.e.) “the foot you just massaged.” There are a number of things you could use to use touch to imprint awareness on one side, like a ball, the floor, or some other object. In the first video I show pre-touching the right foot with a ball. In the second video, I show pre-touching the left foot by stomping it on the floor a couple of times.

3. SLIDERS UNDER ONE HAND OR FOOT

Similar to the first example, replace left/right with slider/non-slider side. This is especially useful for ground-based transitions common in yoga and primal movement.

4. RESISTANCE BANDS

Since you can wear or tie resistance bands to your hands a feet, they are a great landmark for cueing, especially if you’re only wearing one band. While teaching the sequence, first replace L/R with banded/non-banded side. Then take the bands off and cue using L and R to allow student to use their kinesthetic recall.

Filed Under: Body of Knowledge

Reader Interactions

Comments

  1. Shanna Linn says

    September 7, 2021 at 10:34 am

    Hello Laurel. Thank you for this VERY informative discussion regarding online teaching and the dilemma of cueing right and left with success. I have always mirrored my students in live classes, to the extent that I occasionally think of my left side as my right side! I’ve also found that when teaching online, not everyone’s screen mirrors. Some students see my left side as my right side, others see it in reverse. And so the visual and language-based cueing suffers another confusion. Add to that my occasional confusion or mis-cueing on right and left, and we have a less-than-clear situation for sure. Complicating things even more, many students set up their device to see the teacher, yet I am staring at their ceiling fan, bookcase, or ankles and have little notion of how or what they are doing or feeling. Comes with the territory, but we continue to adapt. Your suggestions are so helpful, and your sequences are so exciting. Thank you!! I hope your relocation from NYC has been successful, and I know your new community will be so excited to have you as a local resource and in-person teacher when that is possible again.

    Reply

Leave a Reply Cancel reply

Your email address will not be published. Required fields are marked *

Primary Sidebar

  • Topics

Footer

Join me on Instagram

laurelbeversdorf

Prepare to Pull Up Mini Course Testimonial Time! 👇#repost @wholecore It took 5 MONTHS of training to get my chin above the bar. Is my pull-up picture perfect?  No way! I need a lot more practice to do it gracefully but this milestone feels like a big accomplishment.Last fall I wasn’t even close to doing an unassisted pull up. Then I joined the Prepare to Pull Up program with my #rollmodelmethod teacher @laurelbeversdorf.For 2 months I worked on WHOLE BODY strength exercises designed to prepare my body to do pull-ups.  I worked HARD 2-3 times a week for 12 weeks. I was *so close* but my practice plateaued so I took a break for 6 weeks and started focusing on other exercises. During that time I only attempted 1pull-up once a week. Lo and behold when I went back to training pull-ups I felt a lot stronger and just a couple of weeks later - BINGO! The moral of the story - there is no easy or quick way to do a pull-up or any other strength movement for that matter. It takes consistency, patience, perseverance, guidance and sometimes you just need to take a break.#mondaymotivation💪#wholecore #strongmamas #fitafter50 #fitafter40 #perimenopausefitness
In this week’s episode on the Movement Logic Pod In this week’s episode on the Movement Logic Podcast, I had the pleasure to talk to nutrition scientist, Dr. Ben House, PhD. @drbenhouseDr. House has been working in nutrition and fitness for over 15 years, and has published many articles in peer reviewed, scientific journals.In our conversation, we talk about the intersection between nutrition and fitness, specifically for women between the ages of 40-65 who may exercise and eat with a number of related (but different) goals like performance, health, longevity, and aesthetics.You will learn:Why food fear spreads like wildfire on the internetThat muscle can prevent hyperglycemia and inflammation.How the energy from food (listed on food labels) does not correspond with how your body metabolizes and gets energy from that food.That low carb diets, like keto go back to the mid 1800s and then resurge every couple of decades.That body-building is not just about aesthetics.Why thinner is not automatically healthier and what the “cost of leanness” is.How fat is responsible for the evolutionary success of humans.What sarcopenic obesity is.What apophenia is and how it is responsible for lots of myths about weight gain and menopause.Why 8,000 steps/day and the CDC’s physical activity guidelines will move the needle a lot further than Andrew Huberman’s litany of “protocols”.Ben’s research-supported recommendations for daily dietary intake.What body recomposition is and how it could help people maintain weight loss.LINK IN BIO TO LISTEN 👀Or search Movement Logic: Strong Opinions Loosely Held wherever you get your podcasts. 👨‍🎤👩🏻‍🎤Don’t forget to SU B S C R I B E 💫
It may not seem obvious, but your abdominals play It may not seem obvious, but your abdominals play a very important role in pull ups.So while everyone is out there trying to get abs, you could be out there trying to get pulls ups—working on multiple ways of being strong all at once. You might accidentally get the strongest abdominal muscles of your life.That’s my favorite way to train.Instead of trying to change your body (which women are constantly told they need to do) try to change WHAT YOU CAN DO WITH IT.Have a strength goal. Work toward it consistently. Notice a whole bunch of fringe benefits!Today is day 2 of the Prepare to Pull Up free mini course and you can still join and get all five mini-workouts.Link in bio 👀
It’s DAY 1 of the #preparetopullup FREE mini-cou It’s DAY 1 of the #preparetopullup FREE mini-course!Today students received a pull up warm up with 5 exercises to warm up for pull up practice. One of the exercises was “the dead hang”.Here guest teacher Eli and I share 7️⃣ different ways to bring the dead hang to life!These are wonderful ways to input some excellent, novel loads to your hands, shoulders & spine.Enjoy hanging around with us today! 😉And it’s not too late to join! Link in bio 👀
Giving the phrase “hanging out” in the poses n Giving the phrase “hanging out” in the poses new meaning. 😏😁Tomorrow the Prepare to Pull Up free mini course begins.Participants receive 5 mini pull up specific workouts, one of which includes the exercise Active Hang Knees to Chest (which looks an awful lot like chair pose!)In the spirit of asana-themed pull up bar moves, the exercise would be like “hanging out” in the transition from mountain pose (tadasana) to chair pose (utkatasana).We’ll do this exercise in a quickie 6-min core workout. There may be some planking, too. 😉Buuut, today for my post, I thought I’d riff on the idea that hanging around could invoke some other familiar shapes.If you have a relatively low pull up bar there’s lots of possibilities for playing with the asanas.Feel how, from the perspective of hanging, familiar poses have new stuff to offer your experience than you may not have felt before.And psssst! It’s not too late to join the  Prepare to Pull Up Free Mini Course! We start tomorrow!Link in bio 👀
The Prepare to Pull Up Free Mini Course starts tom The Prepare to Pull Up Free Mini Course starts tomorrow 5/31/23.Get 5 days of quick pull up workouts and exercises. Strengthen your grip, shoulders, core, and even lower body. (This is a whole body, beginner-friendly workout!)Link in bio 👀
When people have had pain in their bodies for a lo When people have had pain in their bodies for a long time, and have tried every solution under the sun, it can be hard to believe that something as simple as movement will get them out of pain. As movement teachers, we know this to be true, and it’s vital that we possess the skills necessary to help our students and clients experience this for themselves.
Need some guidance on how to do that? Right now, we’re offering a site wide sale on ALL of our tutorials!!Every Movement Logic Tutorial contains hours of anatomy, kinesiology, myth-busting, and most importantly, dozens of exercises that will help you train strength, flexibility, and functional movement, for whatever you or your clients want to do in life.And, the more you invest, the more you save, with up to 35% off our popular tutorials.
Sale ends TONIGHT at midnight, so don’t delay. Click on the link in bio to learn more and to save!
😩Feeling stuck in your teaching? 😩😩Bored 😩Feeling stuck in your teaching?
😩😩Bored of the sound of your own voice? 😩😩😩Want to feel inspired, but not sure where to go for help? We’ve been there.
Here’s the good news: we can help you.
💥💥💥Right now, we’re offering a site wide sale on ALL of our tutorials!!💥💥💥Every Movement Logic Tutorial contains hours of anatomy, kinesiology, myth-busting, and most importantly, dozens of exercises that will help you train strength, flexibility, and functional movement, for whatever you or your clients want to do in life.And, the more you invest, the more you save, with up to 35% off our popular tutorials.
Sale ends Monday May 29th at midnight, so don’t delay.🔗🔗🔗Click on the link in bio to learn more and to save!
😩😩😩That feeling when you have taken a ton 😩😩😩That feeling when you have taken a ton of trainings on anatomy and kinesiology but still don’t know how to integrate any of it into your classes.
Well, guess what? We’ve done the heavy lifting for you. Right now, we’re offering a site wide sale on ALL of our tutorials!!Every Movement Logic Tutorial contains hours of anatomy, kinesiology, myth-busting, and most importantly, dozens of exercises that will help you train strength, flexibility, and functional movement, for whatever you or your clients want to do in life.And, the more you invest, the more you save, with up to 35% off our popular tutorials.
Sale ends Monday May 20th at midnight, so don’t delay. Click on the link in bio to learn more and to save!
What does inclusivity as a movement teacher look l What does inclusivity as a movement teacher look like? For one, it’s seeing the people in front of you and helping them to help themselves feel better in their bodies.
Need more ideas on how to do that? You’re in luck! We’re offering a site wide sale on ALL of our tutorials!!Every Movement Logic Tutorial contains hours of anatomy, kinesiology, myth-busting, and most importantly, dozens of exercises that will help you train strength, flexibility, and functional movement, for whatever you or your clients want to do in life.And, the more you invest, the more you save, with up to 35% off our popular tutorials.
Sale ends Monday May 29th at midnight, so don’t delay. Click on the link in bio to learn more and to save!
🤔If the only thing you know to offer your clien 🤔If the only thing you know to offer your clients and students with pelvic floor pain or continence issues is more cowbell – err – more Kegels, we can help.✅The @movementlogictutorials Pelvic Floor Tutorial is jam packed with dozens and dozens of exercises that consider the many and varied reasons why someone might need help with their pelvic floor outside of the standard issue “do more Kegels” response.
✅✅Even more good news: right now, we’re offering a site wide sale on ALL of our tutorials!!✅✅✅Every Movement Logic Tutorial contains hours of anatomy, kinesiology, myth-busting, and most importantly, dozens of exercises that will help you train strength, flexibility, and functional movement, for whatever you or your clients want to do in life.✅✅✅✅And, the more you invest, the more you save, with up to 35% off our popular tutorials.
➡️Sale ends Monday May 29th at midnight, so don’t delay.🔗Click on the link in bio to learn more and to save!
In 2017, @sarahcourtdpt and I noticed a problem in In 2017, @sarahcourtdpt and I noticed a problem in the kind of continuing education available for movement teachers. There was plenty of content to go around - but not much functional, useful, and applicable movement education that people could actually use immediately with their clients (aka Too Much Fluff, Not Enough Substance).So along with @trinaaltman, we set out to do things differently by creating @movementlogictutorials.6 years, 6 tutorials, and 2 additional collaborators later (@anulamaiberg and @yogawalla), we’re pretty proud of what we’ve created.To celebrate, we’re offering a site wide sale on ALL of our tutorials!!Every Movement Logic Tutorial contains hours of anatomy, kinesiology, myth-busting, and most importantly, dozens of exercises that will help you train strength, flexibility, and functional movement, for whatever you or your clients want to do in life.And, the more you invest, the more you save, with up to 35% off our popular tutorials.
Sale ends Monday May 29th at midnight, so don’t delay. Click on the link in bio to learn more and to save! 👀🔗
Load More... Follow on Instagram

Quick Links

  • MEMBERSHIP STUDIO
  • LEARN IN PERSON
  • LEARN ONLINE
  • HOST LAUREL
  • CONTACT
  • BLOG

Start Learning

LEARN MORE

Copyright © 2023 Laurel Beversdorf · Design by GreatOakCircle.com
Privacy Notice - Australia | Privacy Notice - California | Privacy Notice - EU | Privacy Notice | Terms of use | Cancellation Policy

Tired of status quo instruction and ready to move beyond the script?
_____________
Enter your name + email below to join the resistance...errr my list...and get 3 FREE sequences to strengthen and soothe your neck and shoulders using resistance bands, a kettlebell, and therapy balls.
YOUR NAME:
YOUR EMAIL: